For many people, the garage is the most neglected part of the house. It happens to be the dumpsite for a good majority. Yet, with a cluttered garage, it is frustrating to locate certain accessories. Consider these DIY garage shelves ideas and enjoy an organized garage from now on.
Do you remember my dirty and cluttered garage? Well, thank heavens, it isn’t dirty anymore! After I finished decluttering and cleaning our garage, I followed that up by organizing through printable garage bin labels.
For this article, I’ve asked Archie Adams from Homemakerguide.com to explore the possibilities of DIY garage shelving and to help you understand how you can organize your garage better with these DIY Garage Shelves Ideas.
Archie: “I remember visiting this garage, and I came out quite envious! The shelf organization was something to behold. Don’t get me wrong – it wasn’t glittery and expensive and all. Yet, it was the most adequately organized shelving system I’ve seen in a garage. They had the best cordless screwdriver within reach – you ladies out there know how this tool can come in handy. The ceiling was also maximized, and there was still a huge floor space.
Which DIY Garage Shelving Should You Go For?
One thing I’ve encountered in most carports and garages is that people do not use shelves. Things are scattered everywhere, while in some cases, adequately arranged around the walls. Well, there are a dozen garage shelves ideas out there. We will not only assess the ones available – starting from the mildest to the more complicated ones – but we will also look at how to install garage shelves. Ready? Let’s begin.
1) DIY Garage Shelves: Use Your Walls
Remember, the title of this article is DIY Garage Shelves. In other words, you should be able to do this yourself or with maybe just a little help. For that, I’ve found this how-to to be one of the quickest, cheapest, and most efficient ways to install garage walls using 2×4s.
Alternatively, you can borrow a few tips on how to use hooks to act as garage shelves for walls. This ensures you maximize the empty spaces around the wall and on your shelves. These hooks give you ample space to hang simple tools such as hammers, screwdrivers, automotive tools, and the likes. The vision and mission is to optimize garage storage, but still keep it orderly.

Garage Bins Work Wonders with Labels
Too often I’m asked, “Can I build garage shelves?” Others even want to know, “How deep should garage shelves be?”
This unsophisticated but very practical plastic bin mechanism takes away that entire burden for you. It’s also an elaborate way of hiding any messes you may have inside the box – not that I advocate being disorganized in any way. All you need to do is build a system of shelves or stands to support your bins and then label them. Ensure the more substantial containers, as well as the most used items, are on the lower shelves to make it more accessible. Another benefit you get from this system is that you can repurpose it and refurbish, any time you feel like doing a makeover.

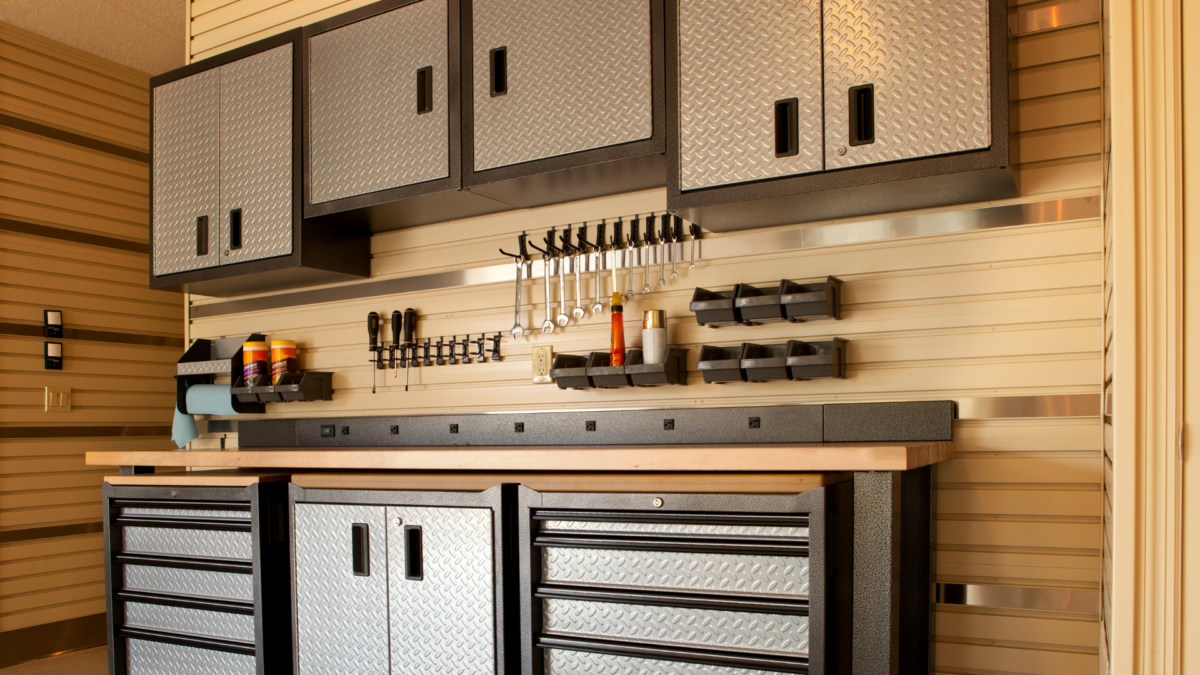
Another way to maximize vertical space, is to use slat walls. Slat walls are always a smart idea if you want to get the clutter of large machinery off the floor. That’s just a bonus, but it gives you easy access to the most needed tools. This is the perfect idea when thinking of DIY garage shelves for tools—no need for a complicated wall system.
The hooks here enable you to hang tools like hand trucks, trimmers, sporting equipment, shovels, brooms, ladders, and anything else that can be hung from a pegboard wall. Furthermore, the hooks form an easy way of hanging baskets that can act as additional storage facilities.
2) DIY Garage Shelves: Top-Down Approach
The most common method most people apply when decluttering and organizing rooms is taking a bottom-up approach. As much as that is applicable, have you thought of moving outside the box and follow a top-down mechanism?
What does that even mean?
The question we are trying to ask is simply this, how can you build DIY garage shelves on ceilings? The first step is to ensure the placement is hooked to a strong supporting beam. By strong, we mean extra-rugged, or else the shelves will come tumbling down. Now we wouldn’t want that, would we? Once that’s out of the way, now it’s time to decide what materials you’d like up there. Some options available to you include flat grates and metal tracks, which are effortlessly buildable. They also give you room to add more shelves should the need arise.
3) DIY Garage Shelves: The Closed-Ended Technique
All along, I’ve focused on open-ended systems (apart from the bins) that have your tools displayed. What if you prefer the low-tone style that has everything out of sight? The options to consider here are either garage shelves or cabinets. When assessing the cabinets’ options at your disposal, consider the purpose for each drawer or cabinet. Heavy machinery may need heavy-duty and spacious drawers.
That said, I’ve found this system relatively easier to install as each piece fits with another, unlike manually making shelves where you have to start taking measurements from scratch. Cabinets offer you a wide array of materials, including wood, PVC, and metal. The best option is one that provides you individual units building upon each other. Make sure your storage space will allow you to install the garage shelves or cabinets you desire.

What About The Workbench?
Before you embark on setting up the classy shelves, one fundamental consideration is to understand the garage’s purpose. If you only use the room for depository purposes, fine! But if you intend to be doing heavy-duty tasks in there, leave room for a workbench. The workbench can act as a multipurpose working area as well as a store place.
So, how wide are garage shelves, and similarly, how wide does this workbench need to be? A couple of feet will do the trick, depending on how large the room is. If you’ll be working while seated (like I usually do), then the underneath section should be left open. However, if you prefer standing, you can add extra shelves or cabinets down there.

Considerations For The Materials
The material to be used for the shelving is one of those optional factors that’s exclusively dependent on your style and purpose. Wood is relatively strong, does not rust, but is mostly fixed on the wall (if you aren’t using portable cabinets.) Metal rack systems offer you the chance to customize the shelving racks depending on the one purchased. This is less standardized than the wood counterpart.
What’s more, these garage shelves on wheels can be moved around easily without disintegrating the individual parts. Another challenge to face when choosing wooden systems is how garage shelves are built from scratch. For example, many fail to consider how high garage shelves should reach when following the top-down approach using frames. The top space should be large enough to store objects a few feet large and should be accessible using a ladder (assuming you have one).
Before You Embark on Building DIY Garage Shelves…Consider This
Step 1: Declutter
Before you decide on how to build your DIY garage shelves, the very first thing is to clear out the clutter. If possible, get everything out of the garage and ensure the weather conditions are just right for that.
Step 2: Categorize
Once everything is out, sort out the items at your disposal. You can donate or give away things you don’t require in garage sales. You need all the hands you can get for this process. There may be family heirlooms stashed in all that pile of mess. When reorganizing, some of the items that should not go back to your garage include paint storage (keep away from extreme heat and cold), propane storage (unless you want to blow up your garage), pet foods and paper goods (goodbye bugs and all you tiny roaches!).
Step 3: Floorplan
Once that’s out of the way, come up with a clear floor plan of how to reorganize as well as how to install garage shelves. The design should consider the purposes of each equipment. The rarely used items can be placed overhead. If you noticed, we’ve maximized the vertical spaced throughout this blog. The choices you have include pegboards, the track-based system, and the panelized system.
Step 4: Painting and Lighting
Before you bring in things to their rightful place, this would be the most convenient time to refurbish in terms of painting and lighting. The threshold of the garage door should be tightly sealed to prevent unwanted visitors, including bugs. Whether you’ll be using garage shelves or cabinets, ensure you have mastered how to anchor garage shelves to walls.
Concluding Remarks
By now, you’re probably a professional garage organizer already. It was already in you; you just needed a little nudge. If you’ve already gotten the push you needed, what are you waiting for? Head over to your garage and give that place a brand new look! And don’t forget to provide us with more ideas on how you’ve organized your garage in the comment section – you are certainly allowed to be artistic!”
About the Author
Archie was a builder for more than 40 years. Mainly after his retirement the enthusiastic electrical works in the garden and writes for a blog Homemakerguide.com to keep himself occupied. His many years of experience can get you the right tool reviews whether it is a drill, welding machine or so. An impressive fact to note about him is that almost everything in his house is a representation of his skills made by his hands.
Want More Tips About Garage Organization and Home Organization?
Are you really exited about home and garage organization? Check out these articles!


« How To Clean Your Oven: 10 Effective Ways
» Organizing Quotes To Inspire You
FREE Kitchen Deep Clean & Declutter Checklists

Hi Karen, I found the image on sasionline.org, but I’m not sure they sell these shelving plans. Perhaps you can create a system yourself? Good luck! Best, Esther
Where can I get the plans for the wood shelves pictured? That is exactly what I need in my garage!