It’s hard to be creative when your favorite craft projects are buried beneath piles of ribbon, paper, and fabric. Here you’ll find loads of ideas to help you corral your clutter and organize craft supplies for good!

I’m a “recovering” crafter. The only reason I tell you this is to reassure you that I used to be that person. You know, the one with fifty unfinished projects, multiple skeins of yarn, tons of tubes of paint, and decorative paper coming out my ears. {Plus, I had extras of everything…just in case}.
Now I craft with words. A lot less clutter! Trust me, I totally get the craziness of craft clutter!
HOW TO DECLUTTER AND ORGANIZE CRAFT SUPPLIES
I am currently helping a super-talented artist clear clutter from her home. Since I began working with her, I have discovered that crafty people tend to view things a little differently than the rest of us. They see possibilities in each and every craft item they own. They don’t necessarily need a clutter-free work environment.
Crafters like to be surrounded by the tools of their trade. It inspires them to be creative.
However, since working with this client, I’ve also learned that crafters need a relatively organized workspace. After all, you can’t paint a great masterpiece if you can’t even find a paintbrush!
Step 1: The Decluttering Part
Before you begin to organize your craft supplies, you should first declutter them. Don’t worry, you don’t have to get rid of everything! The goal here will be to scale back a bit on supplies you no longer need/use, so you will be free to focus your energy on the ones which bring you joy.
My preferred method of decluttering requires you to gather all items of a certain category together, sort into like subgroups, then declutter the items in each subgroup.
I’ve found, particularly with crafters, that this method can be paralyzingly overwhelming. If the thought of using this method of decluttering your craft supplies freaks you out, don’t worry, there is another way!
However, if you are comfortable using The Shock Treatment Declutter Method, then click on over to the post and get to work. Just make sure you come back to this post for some awe-inspiring craft organization systems when you’re done!
If you’re still with me, I’m going to assume you need a kinder, gentler way to declutter your craft supplies. No worries, I’ve got you covered.
If you’re a crafter, more than likely, you create with more than one medium. Perhaps you crochet and sew, paint and sketch. or scrapbook and make jewelry. As such, I recommend decluttering craft supplies by area of artistic expression.
For example, instead of gathering up all of your craft supplies, dumping them into a massive heap, and attempting to declutter them, you should choose one category of craft supplies to focus on at a time.
Say you decide to declutter your scrapbooking supplies. Go on a scavenger hunt throughout your entire home and gather together anything you use for scrapbooking. This should include scrapbook paper, stamps, stickers, scissors, pens, markers, adhesives, stencils, basically anything you could possibly use for scrapbooking.
Next, separate the items you’ve gathered into smaller categories according to type and start decluttering. Be ruthless and honest and work quickly when you declutter.
Above all, don’t second-guess yourself!
Some questions that will help you decide what to keep and what to discard:
- Do I actually enjoy this particular craft?
- Will I honestly ever finish this project?
- If I do complete this project, will I use/display it?
- Do I have enough room in my home/or time in my life for this project?
- Am I holding on to these craft supplies out of guilt? {For the money spent/time wasted}
- Is there someone else who would benefit from these supplies more than I would?
- Would I buy this item again?
- Is this item still useable?
If the answer to any of these questions is “NO”, then be like Elsa {Frozen reference ahead}, and LET IT GO!
Repeat this process for each and every category of craft supplies you own. Once you’ve decluttered everything you possibly can, it’s time to organize!
My favorite (affordable) products for craft organization:
- 12-drawer organizer cart
- Wall-mounted storage for small items
- Portable craft supply storage container
- Non-slip S hangers (to organize fabric)
- Storage cabinet (I love this one so much, I own two of them)
- Clear hanging pocket organizers
Step 2: Prepare Your Space
Whether you have a dedicated craft room, or a corner of the dining room to work with, the first step to organizing your craft supplies is to prepare the space.
Start by emptying out everything in the space (except for heavy furniture) and give the area a good scrubbing.
The good news is, if you followed the Shock Treatment Decluttering Method in the decluttering phase, this part will already be done!
Next, take measurements and draw up a plan for your supplies. Relocate larger furniture to accommodate this plan. Assemble and hang shelves where needed.
Finally, gather up your bins, baskets, jars, etc. It’s time to organize your craft space!
Step 3: A Place For Everything
When organizing craft supplies, try to organize products as the craft stores do.
Instead of stacking bolts of fabric on top of each other, store them vertically. Arrange skeins of yarn in cubbies by color/texture.
Store scrapbook paper in stackable paper trays. Organize smaller items {beads, pins, etc.} in containers with dividers. I’ve included some products below for inspiration!
Remember to store like items with like and keep things close to where you plan to use them. Also, use clear storage containers when possible so you will be able to locate items as soon as creativity strikes.
Step 4: Organize Craft Supplies: Label Last
When organizing craft supplies, don’t forget the cardinal rule all professional organizers agree on. Always, always ALWAYS label everything…AFTER you’ve organized it!
Don’t make the rookie mistake of labeling your containers before you try to fit everything inside, only to discover you have too many/not enough supplies for the bin and need to find a smaller one. Because…removing adhesive labels is a pain in the tookus!
Gratuitous Eye Candy
Here are some of my favorite craft organization ideas from around the web!
This storage idea is the perfect solution for paper crafters. Everything is stored neatly, well-labeled, and in plain view!

Love the open shelving in this craft room which creates a light/airy feel. Notice the rolling cart which keeps craft supplies accessible and can be moved easily.

Look at this awesome sewing space! The addition of a pegboard creates beauty and function!
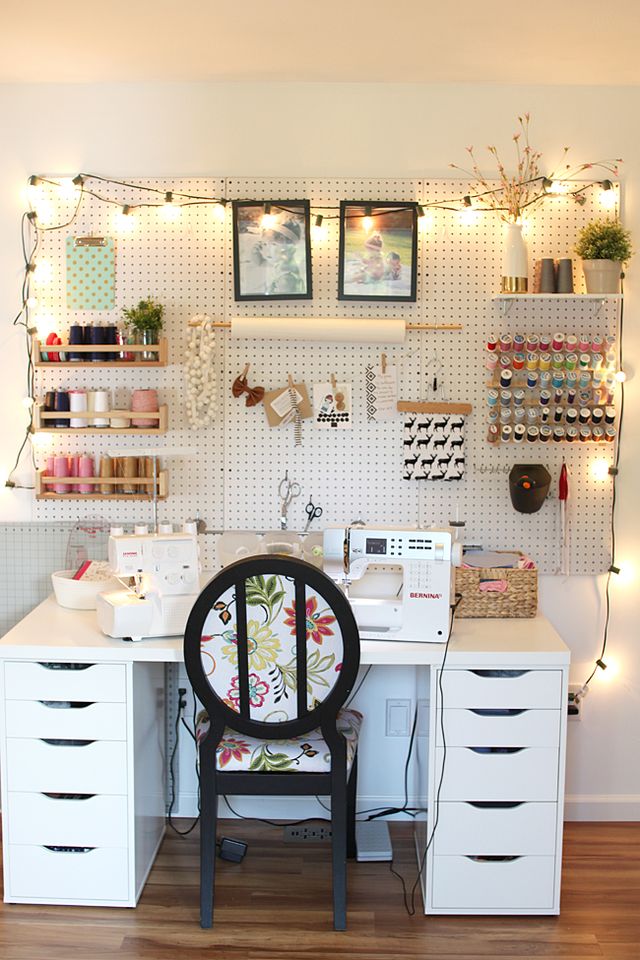
Sometimes, all you need to organize your craft supplies is a couple of bookcases, some pegboard, and a rolling cart. Am I right?

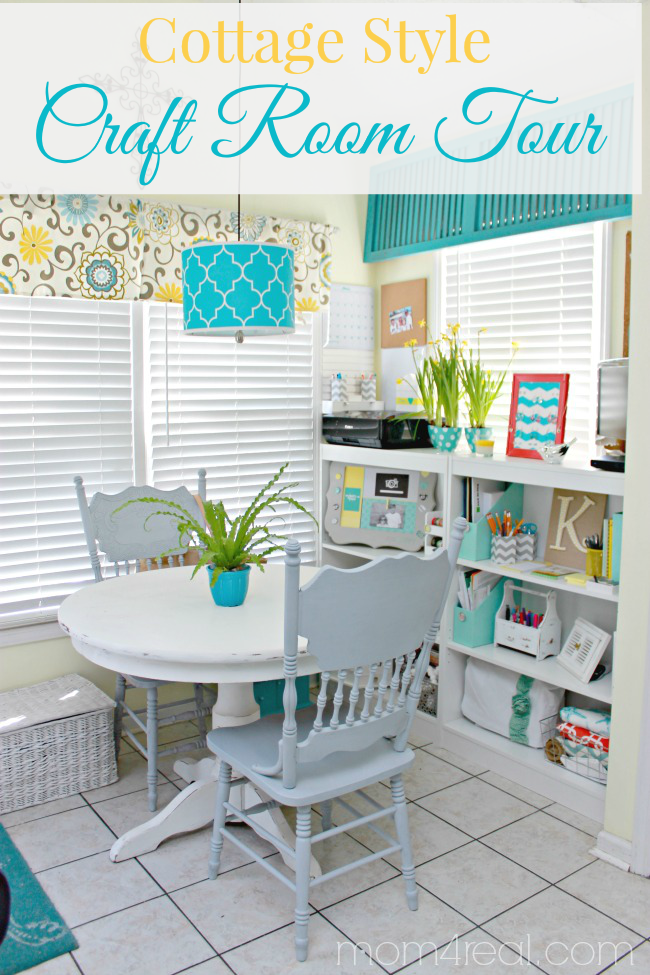
The photo below proves that you don’t need a dedicated craft room in order to be crafty! I love the way she’s incorporated her craft supplies into this cute little breakfast nook!
Again…no craft room? No problem! You can re-purpose a closet into craft central!

This DIY acrylic paint organizer is genius! As well as simple to put together.

Another craft supply closet that is so pretty, you can remove the doors and show it off to the world!


READ MORE:
- 12 Closet Organization Ideas For All Of The Nooks And Crannies
- Declutter Fast With The Shock Treatment Declutter Method
- Decluttering And Repurposing Used Greeting Cards
« Free Printable Pantry Labels: Farmhouse Rae Dunn Inspired
» 33 Wire Basket Storage Ideas For Every Room In Your Home
Hi I read your article and got inspire declutter my scrapbooking supplies!!! Unfortunately I don’t have a craft room my scrapbooking supplies are everywhere in my house. Can you recommend plastic bins that will help me to store my crafting supplies since I don’t have a room I can’t buy a shelve or cubes to organized. My best bet will be plastic bins but which ones?? I want to store my scrapbooking papers, adhesives,paint tubes, stamps and stickers etc. Please help!!!
Alyson,
Thanks for reaching out. I’m sure you’ve heard the phrase, “things usually get worse before they get better”. When you are going through the process of decluttering your craft supplies (which should be done before you attempt to organize), things will get messy. Where you gather together all of your various supplies will depend on the space you have available in your home. You’ll need to designate an area specifically for staging craft items so you can comfortably sort through them. This area may be your kitchen table (or floor), dining room, living room, or even outside on your front lawn (if you have one). Box up like items and transport them to your staging area.
Once you’ve successfully decluttered, you’ll have empty space in your studio which you can then organize according to your specific requirements.
PS: If your studio is so cluttered that you can’t even get to certain areas, you will first have to ‘clear a path’ and declutter as you go. Alternatively, you can use the Shock Treatment Declutter Method if you are feeling really motivated 🙂
I am really eager to learn. I was with you until A Place for Everything. As an artist, this is where I need help. Buying more products isn’t so helpful, I’ve learned from experience. If there is already something in every place in my studio, where do I put the stuff I organized.
I’m also curious about what you mean by “gather together” everything related to a specific medium. In a box? On a table? In the middle of the floor? I’m worried I will make more of a mess if I do this.
One tool I have found helpful – one of those over the door “shoe” storage things with all the pockets. I store small items I might need often, scissors, tape, rotary cutters, stamp pads, elastic for sewing, pens, all sorts of small items that I can see through the clear pockets! It’s helped a lot! Especially since some small tools are used for more than one craft! I put it on the back of the closet door in my spare room/sewing room so its out of sight but easy to access!