Each and every day, multiple pieces of paper enter our homes. How can we deal with this paper clutter and keep it from getting out of control? In our digital age, why can’t we seem to live a paper-free life? Today I will share with you the four steps I have taken in my own home to declutter paperwork.
Think of these 4 steps as your emergency flotation device when you are drowning in paper clutter.
How To Declutter Paperwork In 4 Simple Steps
For the longest time, I dreaded dealing with my paper clutter. It just seemed like such an overwhelming task, one that was better left undone. After all, it was so easy to just pile everything in a box or filing cabinet and forget about it. That is until I actually needed to refer to a paper I had stashed away. It was increasingly difficult for me to locate even our most important paperwork. That’s when I knew I needed to confront the paper clutter monster head-on. So, one day (I think it was a Tuesday), that’s just what I did.
1. GATHER ALL PAPERS TOGETHER
The first thing I did to declutter paper was to collect every piece of paper I had hidden around the house. It’s important to note, that I did not include sentimental papers or my kids’ school papers in this purge. I saved those for when I decluttered my keepsakes. I couldn’t believe all of the places in my home the paper clutter found to hide. There were papers in the junk drawer, on top of the desk, under the desk, in my nightstand drawer, on my kitchen counter, and in the laundry room closet. I even found stray papers in my bathroom cabinets.
2. SORT PAPER BY CATEGORY
The next thing I did was to sort through the paperwork. This was by far the hardest step. I knew which papers I was planning to keep, but first, I had to find them. Thus began the process of inspecting each piece of paper in order to decide whether to put it in the “keep”, “toss” or “shred” pile.
How exactly did I decide ahead of time which papers I wanted to keep? Well, I followed the advice of the experts. After all, they specialize in this sort of thing. Marie Kondo, the author of Spark Joy, says:
“My basic principle for sorting papers is to throw them all away. My clients are stunned when I say this, but there is nothing more annoying than papers.” – Marie Kondo The Life-Changing Magic of Tidying Up: The Japanese Art of Decluttering and Organizing
Too extreme? I created this graphic to help you remember what papers you should hold onto and how long you need to keep them.
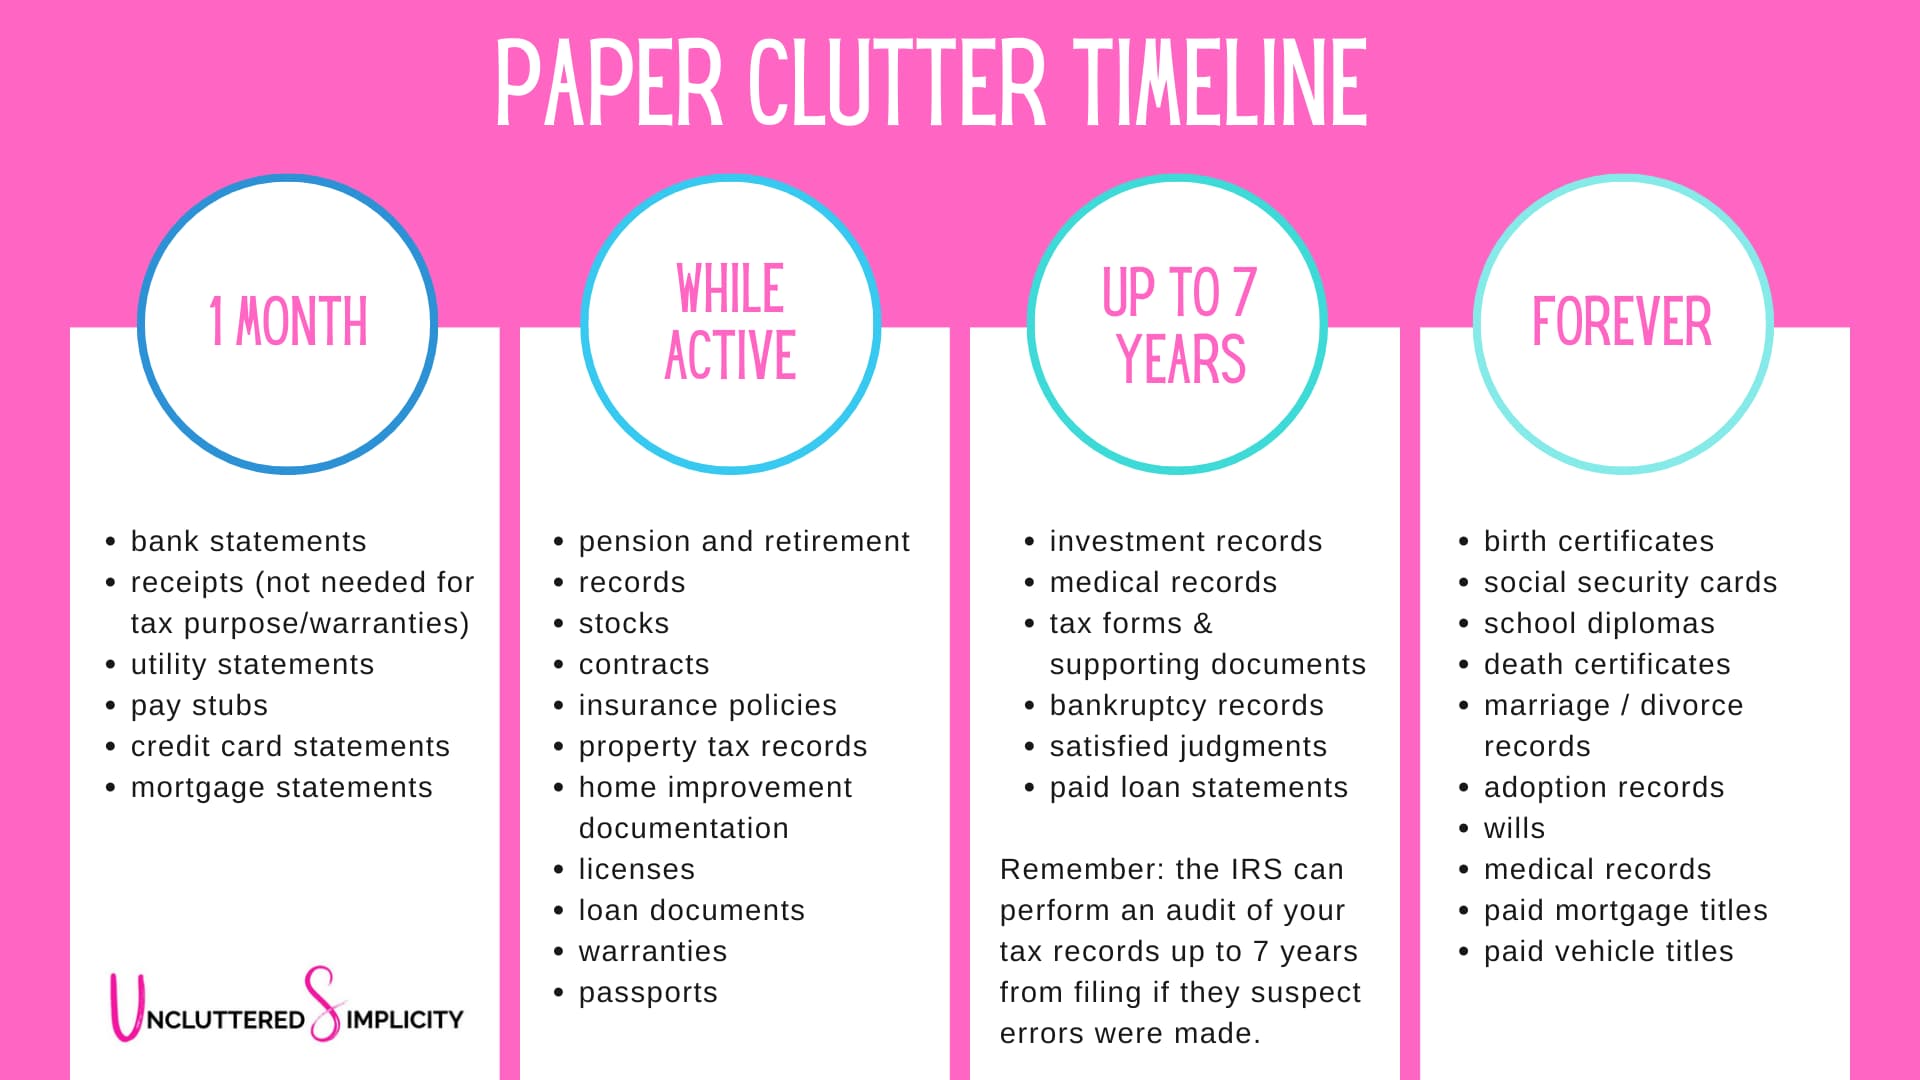
Really, though, we tend to keep far too much when it comes to paperwork. Why do we do this? Usually, it’s out of fear of throwing something away and then finding out we need it later on.
I recommend keeping the following papers (and discarding everything else):
- taxes (6 years)
- social security cards
- marriage/birth/death certificates
- wills
- insurance policies
- mortgages
- titles
>>By the way…have you tried the Cozi App? It’s one of the best tools available to help you declutter paper. AND, it’s FREE! Click here to check it out.<<
3. ORGANIZE WHAT’S LEFT
The third step I took when I decluttered my papers was to deal with the papers in each of the three categories I mentioned earlier.
- Keep- For this category, which was by far the smallest pile, I went back through the papers and decided which ones I wanted an actual physical copy of and which papers I could scan and store on my computer. For this step, you may want to invest in a scanner like this one, use the scan feature on your printer, or use an app on your mobile device.
- Toss- Any papers that do not contain personal identifying information can be tossed in the trash or put in the recycling bin. See, that was easy.
- Shred- Papers that need to be shredded include any that display personal information. This includes; anything showing your social security number, driver’s license number, bank account, credit card numbers, passwords, PIN numbers, medical, financial and legal paperwork. For this, you will need a paper shredder, or you can transport your papers to a shredding service, like Staples, UPS, Fed Ex, or Shred-It, where they will do the work for you.
4. IMPLEMENT A FILING SYSTEM
The final step in the process to declutter paper is to create filing systems for short-term action papers as well as long-term papers.
Your long-term papers are those which you have already taken some sort of action on, that need a permanent home. You may choose to keep these in a filing cabinet, storage box, or a portable file tote. How you decide to organize these papers is completely up to you. Your filing system can be as pretty, color-coded, or utilitarian as you need it to be.
You will also need a second filing system for your daily paperwork which requires some sort of short-term action before being placed in a permanent location. There are several ways to do this. I choose to keep the paperwork which will require my attention sometime in the near future, in a three-tiered tray system. The top tray is where I keep bills that need to be paid and forms that need to be filled out. The middle tray is for items which need to be scanned or filed long-term. In the bottom tray, I keep envelopes, stamps, and coupons.
Tickle my what?
Another way to organize your daily paperwork is to use a “tickler” filing system. I know, that’s a funny name for a filing system, but I’m not the one who came up with it. The purpose of a tickler file system is to organize your daily, weekly, and monthly paperwork into one easy to manage location.
Here’s how to create your own tickler system, using a hanging file system.
Label each of the 12 hanging files with a month of the year. Number the file folders 1-31. That’s it, you’re done.
To use the tickler files, place the folder of the month you are starting on in the front. Inside this folder, place the numbered folders according to date. For example, if you start your filing on January 28th, you will place the folder labeled “January” in the front of the box and the file folders #28-31 inside of it. Folders #1-27 will be placed in the folder labeled “February” as they will be used to organize the following month’s paperwork. File any bills, forms, etc. you receive in the mail, from school, or for work according to the date they are due. In addition, you can write “notes” for time-sensitive information to place in the folders.
Each month you reuse the folders #1-31 by placing them into the next month’s folder. Once you’ve emptied each day’s folder, move it to the next month.
*An example of how the tickler file system works is you receive a water bill at the beginning of January which is due on January 15th. You would either place the bill in folder #15 (if you plan to go into the billing office to pay) or in folder #12 if you plan to mail the payment. Each day, you check the proper date in the tickler file system to see if there is any item that requires your attention.
Just think, no more late payments, lost school forms, or missed deadlines!
Another option for filing short-term paperwork is to create a countertop file system.
You can set up a decorative file box or a tier-system like this one on your counter or desk. Make sure you place it in a location where you will actually use it! Keep the file labels simple and try not to use more than 10. Remember, this is supposed to be easy. For example, you could have folders labeled:
- Kiddo #1 (Keep everything pertaining to child #1 in here. No need to subdivide)
- Kiddo #2
- Mom
- Dad
- Bills to pay
- To do
- Items to scan/file
- Monthly receipts
- Coupons
- Recipes
Check the contents of your “to do” file each day. Every week or so, you will need to go through the items in the first 5 folders and take care of any paperwork inside. Once per month, you should empty out the other 4 files by either throwing papers away or filing them in your long-term filing system.
The most important tip to help you declutter paper is…
If I could only give you one tip that would help you eliminate paper clutter, it would be to sort your mail every day. After collecting your mail for the day, do not throw it in a drawer or on a countertop. Deal with it immediately. Throw any junk mail in the trash or recycle bin right away. Open your mail and place upcoming bills in your short-term action file. Keep a paper shredder near where you open your mail and shred any sensitive documents which do not need to be filed. If you do this one thing, you will drastically reduce the amount of paper clutter coming into your home.
I hope these 4 simple steps help you to declutter paper and get the paper clutter monster out of your house once and for all!

MORE ORGANIZE & DECLUTTER TIPS
- Organizing Paperwork: Best Ways To Corral Paper Clutter
- What To Do With Old Photos You Don’t Want
- 10 Questions To Ask When Decluttering That Aren’t ‘Does it spark joy?’
- Decluttering And Repurposing Used Greeting Cards
- What To Do With Old Photos You Don’t Want?
« Living Small: What It Means And How To Live Small Right Where You Are
» How To Declutter Fast With The Shock Treatment Declutter Method
Thank you so much for your kind words! It truly means a lot to hear that the blog is making a positive difference in your life. Knowing it saves you time and effort is exactly why I love creating this content. I’m so glad you’re finding it helpful! Is there anything specific you’d love to see next?
So much appreciation for the time and effort you are saving me with this beautiful blog!
Great! Good luck Jacqueline!
This is so inspiring, I am starting today to declutter years of university paperwork assignments, tax information, stories that I have written, diary entries, songs, poems and much more.
Saundra,
My best advice would be to keep a separate spiral notebook or binder for each main category to record information so that you are not drowning in bits of paper. For example, you can have one for faith-based information such as Bible verses and sermon notes, another to record medical information, and another for tax items, etc. Then, you can toss the bits of paper and store the binders or spiral notebooks neatly on a shelf.
My paper clutter is different than any I see posted. I have different size papers with a variety of unrelated information on each one. For example: one small paper might have tax information, another with information on car insurance, one with a Bible verse, one with games to play, one with information for the doctor concerning my health problems, one with sermon notes, one with recipe on it, one with a list of names and telephone numbers, one with credit information about my son, another is a strip of paper with costs of two areas of car insurance. It goes on and on. Piles of little pieces of paper. Do you have any suggestions?